TIMEZERO & DRS Direct Connection FAQ Print
Modified on: Thu, 18 Mar, 2021 at 12:57 PM
What DRS Radar can I plug directly to TIMEZERO (TZ Navigator & TZ Professional)?
You can connect any DRS radar directly to TIMEZERO without MFD on the network. Note that TIMEZERO needs to be connected to a GPS and Heading sensors for the radar to operate properly.
What do I need to plug the DRS Radar directly to TIMEZERO?
You will need a GPS and Heading sensor connected to TIMEZERO if you want to use ARPA and Radar Overlay. GPS and Heading sensor can be connected using either NMEA0183 or NMEA2000 through the Connection Wizard of TIMEZERO.
Note: When using NMEA0183 to provide heading information to TIMEZERO, the heading sentence refresh rate needs to be 10Hz (10 times per second) or higher for ARPA.
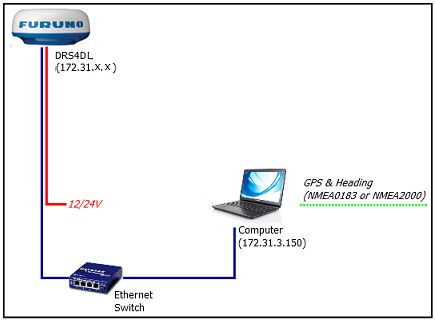
It is not recommended to connect the DRS Ethernet cable directly to the computer. Instead, we recommend connecting the PC through a switch with an additional Ethernet cable (not provided). This will give more flexibility regarding the placement of the power supply unit which is included with some DRS model. This will also allow you to add other type of Furuno Ethernet sensors (AIS, Sounder…) later on. In order to communicate with the DRS, the Computer IP address must be setup manually to 172.31.3.150 with a subnet mask of 255.255.0.0.

Connect GPS, Heading and optional additional instruments to the computer using one or multiple COM ports (through a USB to Serial adapter if needed) or through NMEA2000 via the Actisence NGT1 Gateway.
Important information regarding heading: If you want to overlay radar on the chart, acquire ARPA targets or use the North-Up Orientation of the Radar WorkSpace, you have to provide Heading to TimeZero. For reliable ARPA, the heading refresh rate must be 10Hz or more (the heading sentences must be received 10 times per second or more). If TimeZero only receives heading once per second, ARPA reliability is not guaranteed.
Note: If you connect the Heading Sensor using NMEA2000 the refresh rate is always 10Hz.
Set the IP of the Computer
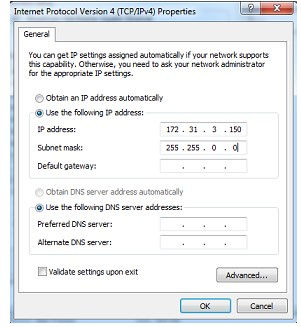
The computer needs to have an IP address that “matches” the Furuno Network (172.31.x.x/255.255.0.0) in order to exchange information with the DRS. We highly recommended using 172.31.3.150 as a fixed IP address for the computer with a subnet mask of 255.255.0.0.
Open the "Network Connections" control panel of your computer to adjust the IP address. Under Windows 8.1 and Windows 10 you can press the combination shortcut “Windows Key” + X and select directly the "Network Connections". Under Windows 7, click on the Windows “Start” menu and search for “Network”. Under the “Control Panel” category, click on “Network and Sharing Center”. Once the Network and Sharing Center window is opened, click on "Change Adapter Settings".
Double click on the Network Adapter connected to the radar (usually “Local Area Connection”).
Note: If you have multiple Area Connections (multiple Ethernet Cards) and if you don’t know which one is connected to the radar, you can temporary disconnect the Ethernet Cable from the computer and look at which icon will display a red cross. This will indicate the LAN that has been disconnected from the computer, and thus the one that needs to be configured.
Select "Properties" on the "Local Area Connection Status" window. Double click on “Internet Protocol Version 4 (TCP/IPv4)”. Use the fixed IP address 172.31.3.150 with a subnet mask of 255.255.0.0:

Once the computer's IP address has been assigned, launch TimeZero in Navigation Mode. Open the "Options" by clicking on the "TimeZero" logo (located at the top left corner) and select "NavNet". Make sure that the Radar is detected. Do not proceed to the next step until all Furuno Ethernet sensors are properly listed.
Note: Make sure the DRS is turned ON before starting TimeZero. TimeZero will not display the Radar features if the DRS is turned OFF or not present on the network.
Full TZ user guide available here